
Introduction
A spotless grate keeps food safe, tastes pure, and lets heat flow. If grease builds up, flames jump, burners sputter, and steaks pick up odd smells. Many owners skip cleaning because they think it takes hours or needs strong solvents. The truth is different. With basic tools and a short plan, your gas grill can shine before dinner.
You can clear grease, burnt sugar, and stuck sauce in 15 minutes using items already in the kitchen, not harsh lab mixes.
That fast win means more time grilling, less time scrubbing, and a grill that lasts longer between big overhauls.
Why clean gas grill grates after each cook?
Sticky bits harden in minutes. If they cool in place, they block heat, feed flare-ups, and can carry germs on the next meal.
Brushing while the grate is still warm removes up to 90 % of fresh residue, keeps burners clear, and stops smoke flavors from turning sour.
What happens when bits stay put
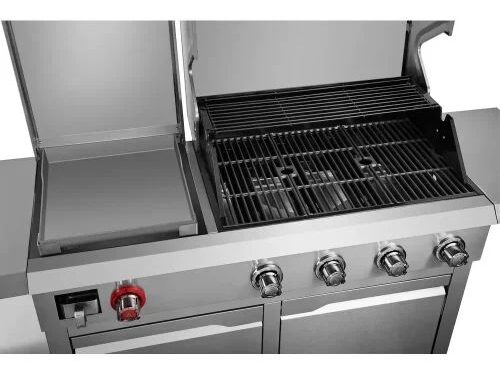
Food scraps left overnight turn into carbon. Carbon steals heat before it reaches new food. It also cracks chrome or porcelain coatings and invites rust on bare steel. On a gas grill, blocked ports change the air–fuel mix. The flame then lifts off the burner or blows out in wind. A blocked burner can leak gas sideways, causing hot spots that warp grates.
| Result of skipping quick clean | Effect after 1 week | Effect after 1 month |
|---|---|---|
| Grease layer | Sticky feel | Thick, tar-like coat |
| Burner holes clogged | Uneven flame | Yellow tips, blow-outs |
| Chrome or enamel chipped | Small dull spots | Rust threads visible |
| Off flavors | Mild smoke | Bitter, acrid taste |
A short post-meal brush makes each part stay in spec. It also cuts big clean time later because layers never pile up. Think of it as wiping a pan instead of sanding it later.
Safe tools you already own
A stiff nylon brush works on warm (not red-hot) metal. A ball of heavy foil pinched with tongs scours cast iron without lifting seasoning. If you season the grate with a thin film of high-heat oil before shutting the lid, the next meal lifts clean again. No wire bristles, no grinder wheels, no mystery liquids.
Hot or cold: when is gas grill scrubbing easiest?
Right after cooking, surfaces are near 400 °F. Ten minutes later they drop under 250 °F. Owners often wait until the grill is cold, but that choice means fat turns solid and bonds tight.
Warm grates at about 250–300 °F let grease soften without burning hands, making scrubbing two times faster than on cold metal.
Temperature sweet spot
Set burners to low for three minutes after food comes off. Close the lid. Heat remelts sugars so they wipe off. Shut gas, open lid, and let it drop to a safe touch range for tools.
| Cleaning phase | Target temp | Why it works |
|---|---|---|
| Burn-off (lid closed) | 400 °F | Turns drips to ash |
| Cool-down (lid open) | 250 °F | Fat soft but safe to work |
| Cold scrape next day | <90 °F | Grease solid, hard to move |
Handling safety
Wear heat-resistant gloves. Keep a spray bottle of water near in case stray flame flicks. Use long tongs to hold foil or nylon pad. Turn off the propane knob first, then valves at the tank. Never spray chemical cleaner on a hot flame; steam can sting eyes.
Warm cleaning also saves gas because you use leftover heat, not a new fire. If you forget and the grill is cold, remove grates, soak in hot soapy water for five minutes, then scrub. It takes longer than the warm method but still beats waiting a month.
Can aluminum foil replace a gas grill brush safely?
Wire brush bristles can break and stick to food, a known choke risk. Foil balls look simple, but do they clean deep?
A heavy aluminum-foil ball crushed to the size of a lemon removes loose bits well, yet it cannot reach between thin bars as fully as a purpose-built nylon or stainless coil brush.
How to form and use a foil scrubber
Tear an 18-inch sheet of heavy-duty foil. Crumple into a loose ball. Fold edges back toward the center to thicken walls. Grip with locking tongs. Press and roll across grates at a slight angle. The crinkles dig in but collapse if they hit a sharp point, so they do not shed.
| Tool | Reach | Removes baked carbon | Risk of shedding |
|---|---|---|---|
| Foil ball | Fair | Low | None |
| Nylon coil brush | Good | Medium | No bristles |
| Wire bristle brush | Excellent | High | Bristle ingestion |
When foil is enough
Use foil for day-to-day quick wipes. Switch to a nylon coil brush every week to lift deep set carbon. Avoid steel wool on porcelain-coated grates; it scratches glaze and invites rust. Never dip foil in acidic cleaners; acid weakens foil and can leave gray smears on stainless.
By mixing tools—foil for fresh mess, brush for weekly detail—you keep cost low and metal safe. You also dodge loose wires on the burger.
How long does a gas grill deep clean actually take?
Big cleans scare people. Many guides quote an hour. Reality: 30 minutes if you plan and avoid over-soaking.
With parts laid out, a full strip-down, scrub, rinse, and re-build clocks 25–35 minutes on grills under four burners.
Time map for a mid-size grill
| Step | Task | Minutes |
|---|---|---|
| 1 | Heat on high to burn residue | 3 |
| 2 | Shut gas, cool to 200 °F | 2 |
| 3 | Remove grates, flavor bars, drip tray | 2 |
| 4 | Soak parts in hot soapy bucket | 5 |
| 5 | Scrub cook box with plastic scraper | 4 |
| 6 | Brush burners, clear ports with paper clip | 4 |
| 7 | Rinse, dry, and oil grates | 5 |
| 8 | Re-assemble and leak-check | 3 |
| Total | 28 |
Trim the clock
Fill a tote with hot water before you start cooking so it is ready. Keep a shop vacuum nearby to suck loose ash. Use a wide plastic putty knife; it scoops more per pass than a narrow grill scraper. Air-dry parts in the sun while you wipe the lid. For stubborn soot, apply a paste of baking soda and dish soap, wait two minutes, then wipe.
These small steps shave minutes without cutting quality. They also avoid long chemical soaks that can dull stainless trim.
Should you oil gas grill grates after every wash?
Oil stops rust and keeps meat from sticking, but it can burn if too thick.
A thin coat of high-smoke-point oil wiped on warm grates after cleaning shields metal, keeps seasoning even, and makes next-day scrubbing easier.
Best oils for high heat
Choose oils that stay stable past 400 °F.
| Oil | Smoke point | Sticky risk | Taste impact |
|---|---|---|---|
| Peanut | 450 °F | Low | Mild nutty |
| Avocado (refined) | 520 °F | Very low | Neutral |
| Canola | 400 °F | Medium | Neutral |
| Olive (extra virgin) | 375 °F | High | Noticeable |
Dip a folded paper towel in oil, pinch with tongs, wipe bars in one smooth pass. Do not drizzle; puddles gum up and flare. If using cast-iron grates, heat to 350 °F after oiling for five minutes to bond the layer. Stainless needs only a quick wipe.
Why not skip oil?
Bare steel rusts overnight in humid air. Even porcelain-coated surfaces develop micro cracks. A thin oil film fills pores and sheds water. It also stops salty marinades from pitting chrome. The practice adds maybe 30 seconds yet doubles coating life.
How often must a gas grill deep clean?
Daily brush-downs delay big jobs, but grime still creeps in. Burners clog, drip trays fill, and spiders nest near valves.
Deep clean every 50 hours of cooking or at least once each season; high-use grills need monthly detail to keep flames blue.
Simple schedule
| Grill use level | Cooks per week | Quick brush | Deep clean |
|---|---|---|---|
| Light | 1–2 | After every cook | Start and end of season |
| Medium | 3–4 | After every cook | Every 3 months |
| Heavy (party, catering) | 5+ | After every cook | Each month |
Signs a deep clean is due
- Yellow flames or low heat even on high
- Uneven sear marks left to right
- Black flakes falling on food
- Grease fires when lid is shut
If any two signs show up, schedule a deep clean that week, even if the calendar says later. Safety beats routine. Store a spare drip pan and igniter battery so you finish in one go.
Conclusion
A gas grill only works as well as its grates are clean. Warm-temperature brushing, foil for daily wipe, a monthly nylon detail, and a seasonal full strip keep heat even and food pure. Thin oil after each wash seals metal, while a clear schedule stops hidden buildup before it causes flare-ups. Follow the simple 15-minute plan, and the grill returns to showroom shine night after night, with no harsh chemicals and no wasted weekend.